Full Setup for Storage Provider and PC-C1 Supra Sealing Compute Provider
Introduction
In this example, we'll demonstrate how to setup and initiate sealing process from the Storage Provider side and execute PC1, PC2 and C1 stages of the sealing pipeline on the Sealing Provider side. C2 stage is delegated to web3mine Market.
If you are interested in Supra C2 sealing on the web3mine Market or locally for your Storage Provider visit C2 sealing tutorial
Sealing Provider
Requirements
- Job server binary. If you haven't installed it yet, visit download page to download the latest
job-serverbinary. - Connection to the running Lotus node
- Sealing worker binary. If you haven't installed it yet, please follow the instructions in Installing a SupraSeal-based Sealing worker.
Run the Job server
You will need a running Job server daemon. There are two main CLI parameters you need to specify:
--lotus-uri: address of the running Lotus node with enabled API access. This can be any Lotus node with read access to fetch chain data.--sealing-root: directory where sealing workers will output sealed sector and cache files. Job server will serve them for for transfer.
Example:
./job_server run --lotus-uri http://my-lotus-daemon:1234 --sealing-root /mnt/seal/
Run the SupraSeal-based Sealing worker for PC1, PC2 and C1 stages of the pipeline
SupraSeal worker supports two modes of operation:
- daemon: periodically polls for sealing jobs from job server
- on demand sealing: requests jobs once, executes them and shuts down
In this example we'll be running sealer as a daemon. CLI parameters you should specify:
--job-server-uri: address of the job server from where worker will requests sealing jobs--sealing-root: output directory for sealing artifacts. Must be same as Job Server--sealing-root.daemon: subcommand that starts worker as a daemon--batch-size: number of jobs in a batch (for Supra Sealer this must be power of two and it's usually 64 or 128)--poll-period: sleep time between two subsequent unsuccessful polls--pc1 --pc2 --c1: stages of pipeline that worker should execute. On this worker we want to execute PC1, PC2 and C1 stages.
Example:
./supra --job-server-uri http://localhost:3000 --pc1 --pc2 --c1 --sealing-root /mnt/seal daemon --batch-size 64 --poll-period 1m
Since there are no jobs present on the Job Server at the moment worker will continuously poll unsuccessfully. In the next stage we will start Relay on the Storage Provider side and initiate sealing process.
Storage Provider
Requirements
- Relay binary. If you haven't installed it yet, visit download page to download the latest
filmine-relaybinary. - access to your miner's RPC endpoints (network access to http/gRPC endpoint)1
- lotus-miner admin token1
- Connection to the Sealing Provider where PC1, PC2 and C1 jobs will be executed
- Access to web3mine Market to delegate C2 job executions
Market Authentication
As a first step you should register your Relay instance on the web3mine Market. That's the place where Relay will send C2 jobs to be executed after PC1, PC2 and C1 are finished. After submitting C2 job to the Market, Relay will periodically poll if someone executed that particular C2 job and pass the proof to the Lotus Miner.
As a first step you need to get get the OTP for your relay instance. You can register your instance by signing up on our platform https://dashboard.web3mine.io/dashboard using Discord. When you get your OTP run following command:
./filmine-relay register --market-uri https://market-api.filmine.dev <OTP>
After successful registration, web3mine Market tokens will be stored on your system and Relay will use them to communicate with the Market.
Run the Relay
CLI parameters you should specify:
daemon: subcommand that starts Relay daemon--market-uri: address of the web3mine Market where Relay will send C2 jobs to be executed--lotus-miner-api: address of the Lotus Miner API--lotus-miner-token: Admin token for accessing Lotus Miner API--exposed-addr: accessible address on which Lotus Miner will send requests for remote sealing to Relay--trusted-listen: address on which Relay daemon will listen for requests from Lotus Miner (if there's no NAT between Miner and Relay this should be same as--exposed-addr)--job-queue-uri: address of the Job Server on Sealer side where Relay will create jobs and fetch job outputs--storage-provider-id: Miner id
Example:
./filmine-relay daemon --market-uri https://market-api.filmine.dev --lotus-miner-api=http://192.168.0.10:2345 --lotus-miner-token=<TOKEN> --exposed-addr http://192.168.0.11:33112 --trusted-listen ":33112" --job-queue-uri 192.168.0.15:3000 --storage-provider-id=221165
Start sealing
Add initial sealing job by using the following command sectors add-job command.
Example:
/filmine-relay sectors add-job --job-queue-uri http://192.168.0.15:3000 --storage-provider-id 221165 --sector-id 600 -n 64 --lotus-miner-token <TOKEN> pc
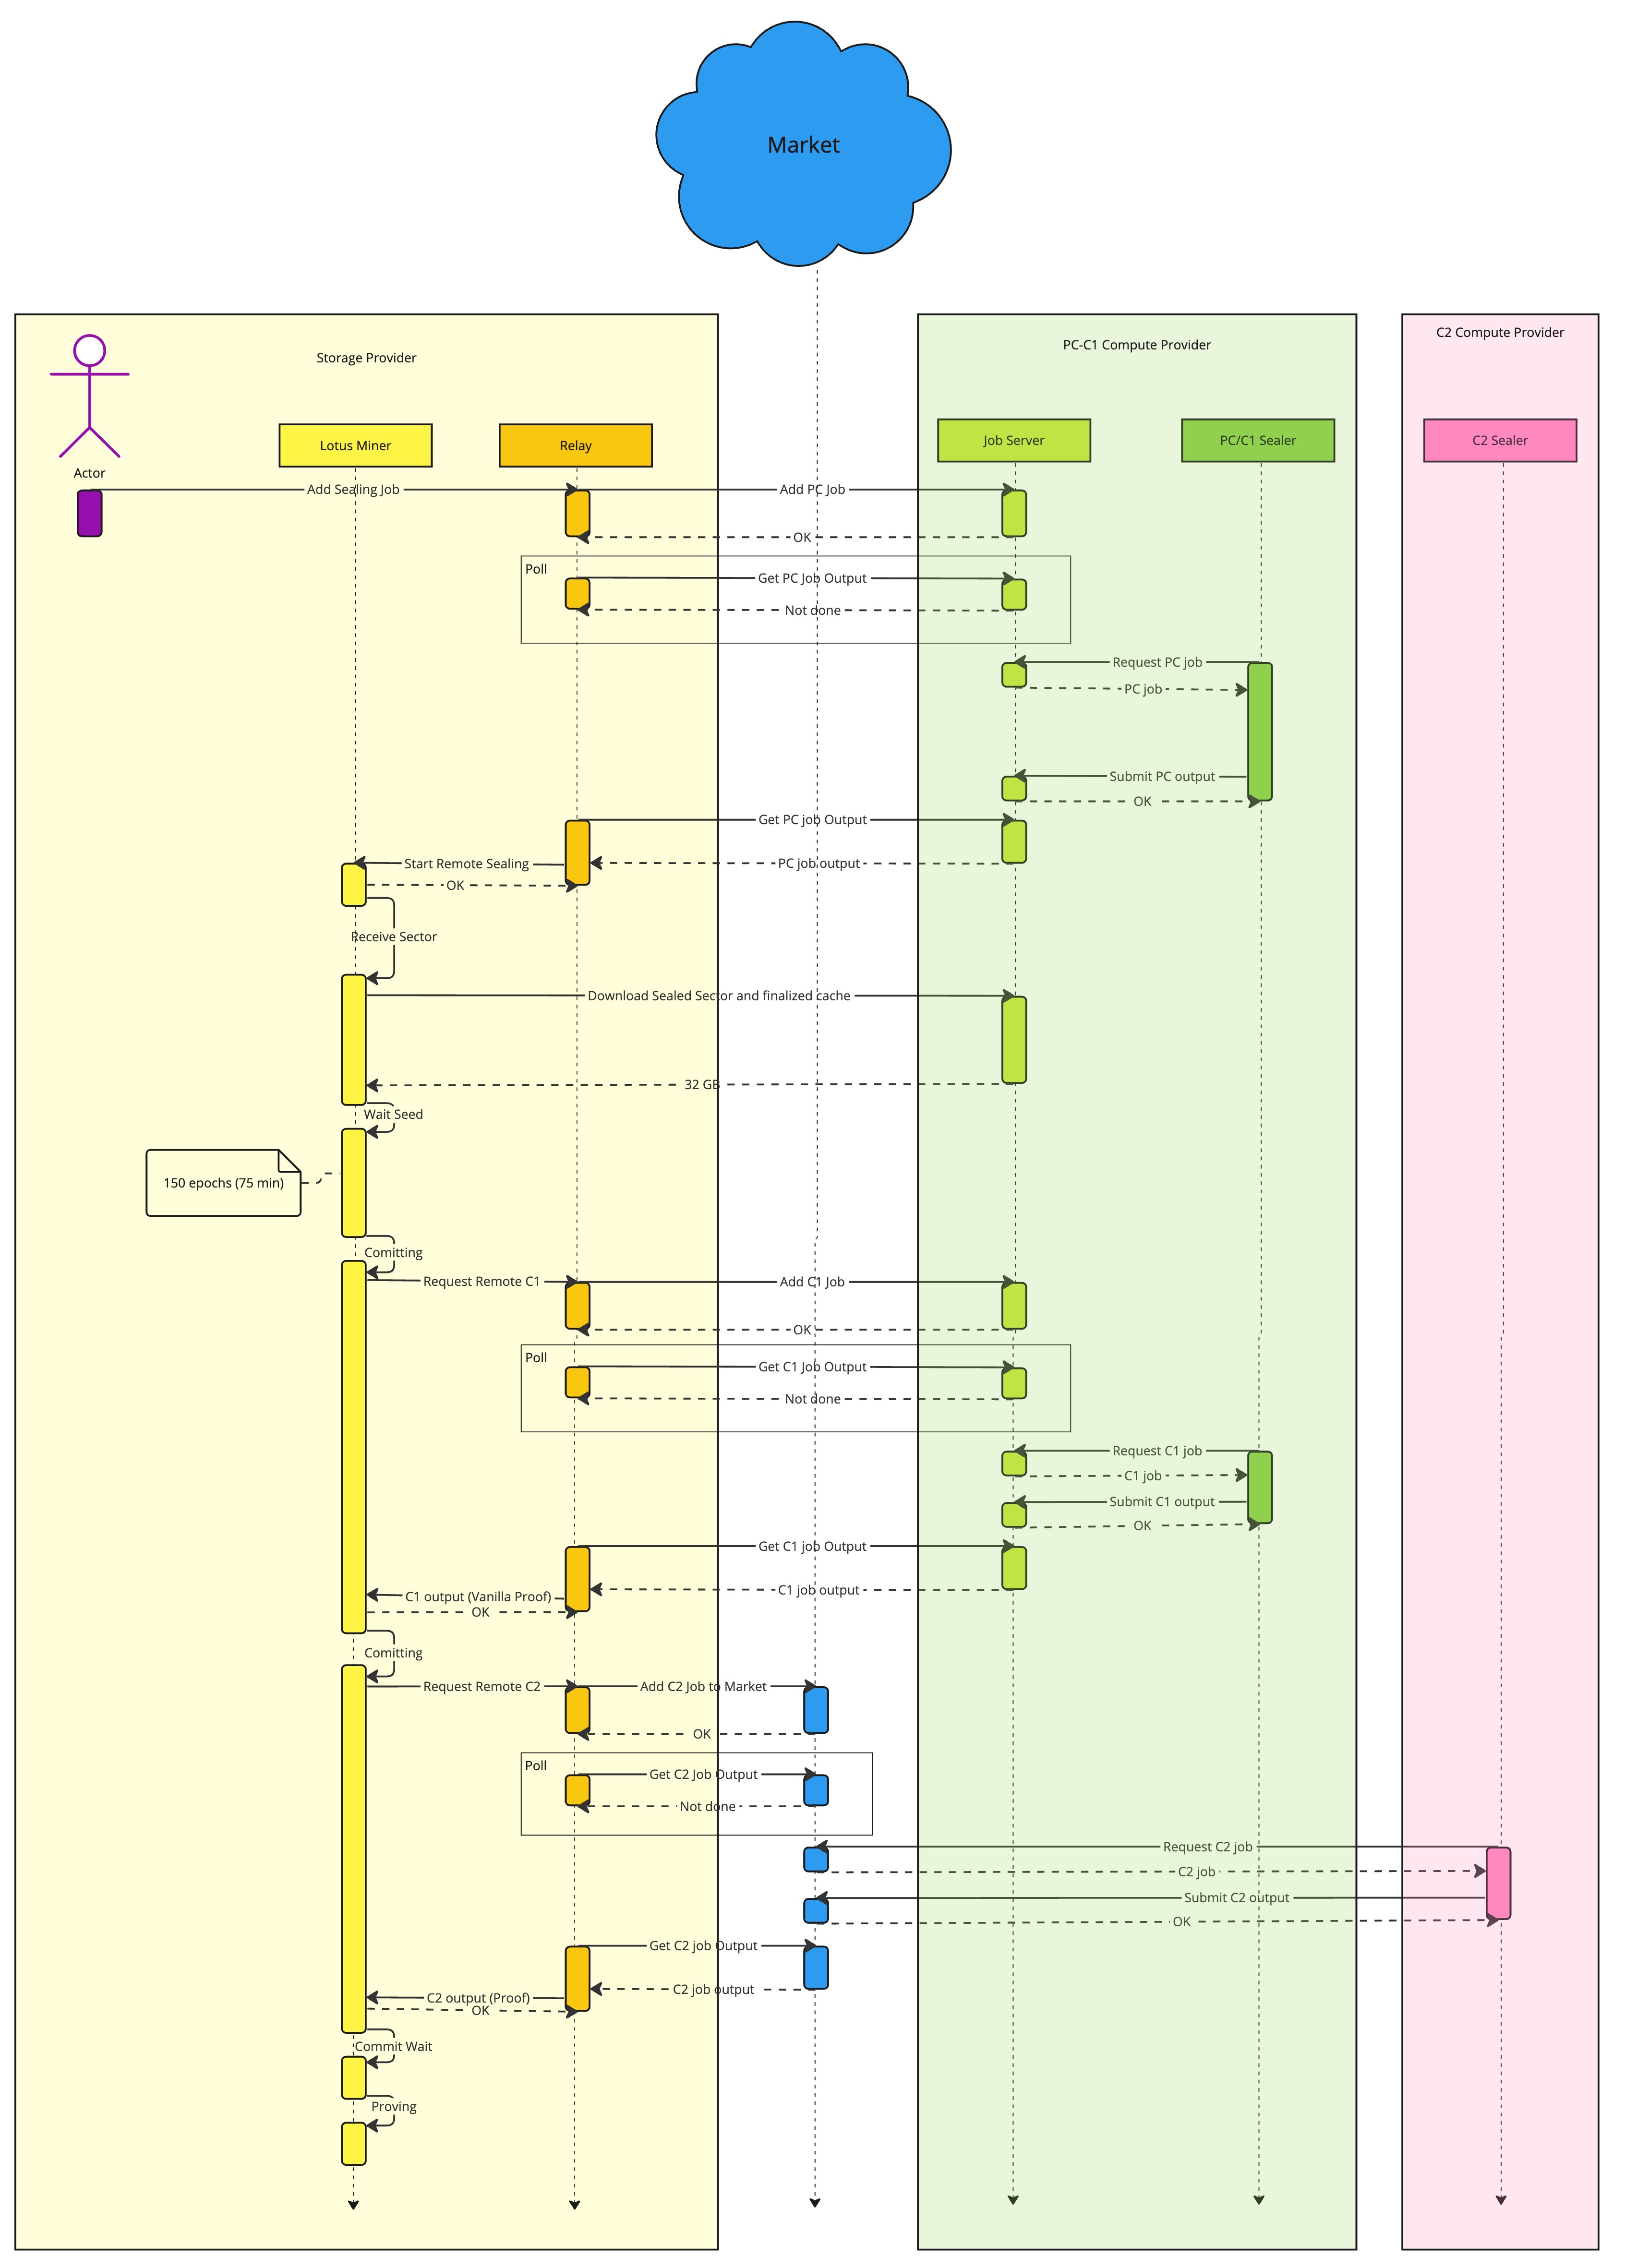
On next poll Sealing worker should be able to fetch jobs and start execution. After successful sealing and sending of the outputs to the Job Server worker will cleanup cache files and request next batch of jobs.
Detailed flow for one job is illustrated in the following diagram: